May 1, 2026 · Preset Filters
How to Use Lightroom-Style Filters Free Online
Color grading turns a flat, unprocessed photo into something that actually feels finished — a warm sunset glow, a cool cinematic teal, a faded vintage look that suggests a decade gone by. Adobe Lightroom has long been the professional standard for this kind of work, but it requires a Creative Cloud subscription and runs as a full desktop application. If you just want to apply a color grade to a few photos quickly, that's more than most people need. These free photo filters online bring the same core concepts — tone curves, split toning, white balance, film emulation, vignette — directly into your browser, with nothing to install and nothing to pay.
What color grading actually does to a photo
Color grading is the process of altering the tonal and color qualities of an image to create a specific mood or visual style. Every color grade is a combination of a handful of operations applied to each pixel:
- Tone curve: An S-shaped curve that compresses shadows and lifts highlights — the main driver of contrast and visual punch.
- Exposure, blacks and whites: Overall brightness, a lifted black point for a matte look, or a pulled-down white ceiling for a flat film feel.
- White balance: A temperature and tint shift — warming towards amber, cooling towards blue, or introducing a magenta or green cast.
- Saturation and vibrance: Saturation scales all colors uniformly; vibrance boosts only the less-saturated areas, so skies pop without blowing out skin tones.
- Split toning: A separate color cast for shadows and highlights independently — the classic teal shadows / orange highlights of cinematic footage live here.
- Vignette and grain: A radial darkening towards the edges and subtle luminance noise, both borrowed from analog film photography.
The preset filters on AI PixFix apply all of these operations simultaneously in a single pixel pipeline running through the Canvas API. Each preset is a recipe of specific values: exposure, contrast, blacks and whites, temperature, tint, saturation, vibrance, split-toning colors and amounts, vignette strength, and grain level.
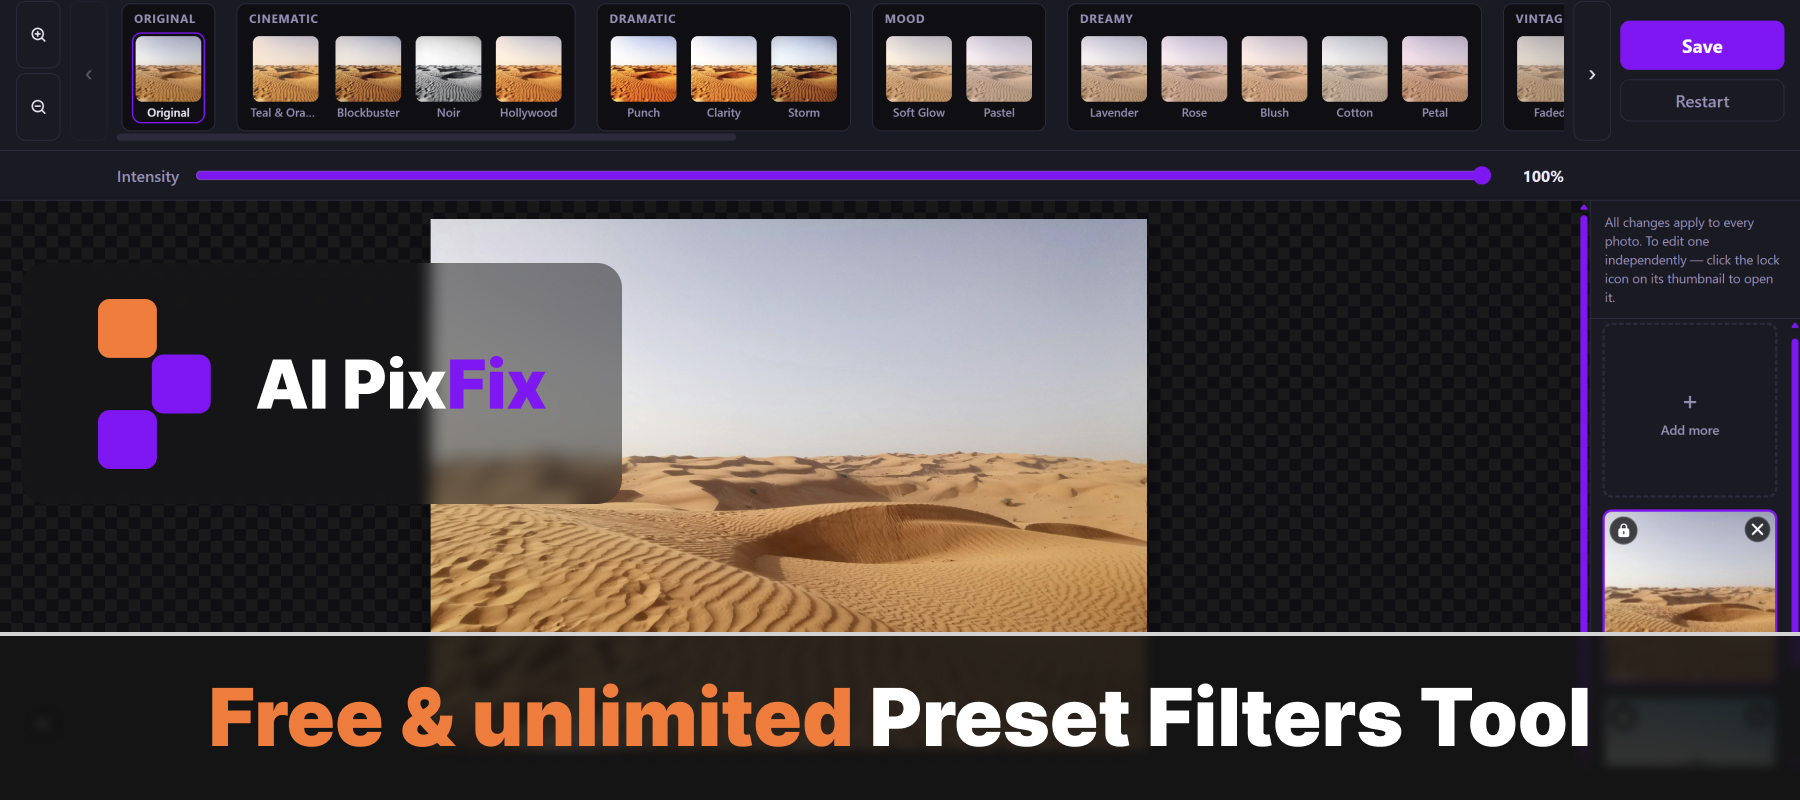
How to apply photo filters in your browser — step by step
Upload your photos
Drop up to 10 JPG, PNG, or WebP files into the upload zone — or click to browse. All photos are loaded directly into your browser; nothing is sent to a server at any point.
Pick a preset
Browse the preset toolbar at the top of the editor. Presets are organized into groups by visual style: Cinematic, Film, Vintage, B&W, Matte, and more. Click any thumbnail to apply it instantly to the live preview.
Adjust the intensity
The intensity slider below the toolbar runs from 0% (the original, unchanged image) to 100% (the full color grade). Any value in between crossfades the two — so you can dial in exactly how heavy the effect should look.
Save
Click Save. Each photo is exported separately at the full original resolution — JPEG at 0.95 quality for JPG and WebP sources, PNG for PNG sources to preserve transparency. No archive, no watermark.
One preset across the whole batch — or a different one per photo
The most common use case for color grading a series of photos — a wedding, a product shoot, a trip — is to make them all look visually consistent. Upload up to 10 photos at once and the editor applies your chosen preset and intensity to every image in sync. Change the preset and all of them update. Adjust the intensity slider and every photo shifts together.
But sometimes one photo in a series was shot differently — different lighting, a different subject, or just a different time of day — and it needs its own treatment. Click the lock icon on any thumbnail to break that photo out of the batch. It inherits the current global settings as a starting point, then you pick a completely different preset or intensity for it alone, while all the other photos stay in sync with each other.
This is how the online color grading tool handles mixed batches: the majority of your series stays consistent, one or two frames get individual treatment, and everything exports together in one Save pass.
37 presets across 12 groups — what each style does
Presets are organized by the mood they produce, not by the technical parameters underneath:
Teal & Orange (split-toned shadows and highlights — the look of Hollywood blockbusters), Blockbuster (underexposed, deep navy shadows), Noir (high-contrast B&W with a blue shadow tint), Hollywood (warm lifted highlights, slight saturation boost).
Four emulations based on well-known film stocks: Portra 400 (neutral warm skin tones, soft contrast), Fuji Velvia (punchy saturation, vivid greens), Kodak Ektar (vivid reds and warm shadows), CineStill 800T (cool tungsten-balanced shadows, warm halation in highlights, visible grain).
Faded (lifted black point, muted warm colors, subtle grain), Kodak 70s (warm temperature, green-leaning tint, brown shadow cast), Polaroid (cool-blue shadows, lifted blacks, cream-yellow highlights).
Seven genuine channel-mixer variants — not a simple desaturation. Classic uses Rec.601 luminance weights; Red Filter pushes reds bright for dramatic skies; Yellow Filter gives a classic landscape look; Green Filter smooths skin and glows foliage; High Key lifts exposure for an airy result; Deep Noir adds dense shadows, heavy vignette and grain; Platinum prints a warm-tinted silver tone.
Lighter grades for portraits, social media, and product shots — pastel lifts, rose and lavender tints, faded matte finish, arctic cool blues, amber warmth, and neon-saturated pop.
Lightroom presets vs browser-based color filters — what's different
Adobe Lightroom is a complete professional photo management and editing application that requires an Adobe Creative Cloud subscription. It supports RAW file editing, a full photo library, masking, local adjustments, and a preset system where .xmp files can be shared, bought, and sold. It is a significantly larger tool than what you need if your goal is simply to apply a consistent color grade to a batch of JPEG photos before posting them.
AI PixFix is not a Lightroom replacement — it is a focused browser tool that applies the same color science concepts (tone curve, white balance, split toning, saturation, vibrance, vignette, grain) without a subscription, without a desktop install, and without your photos ever leaving your device. No RAW support. No photo library. No masking. For quick Lightroom-style color grading on JPEGs and PNGs, it does exactly that, free.
| Feature | AI PixFix preset filters | Adobe Lightroom |
|---|---|---|
| Cost | Free | Requires Creative Cloud subscription |
| Where it runs | In your browser, no install | Desktop and mobile application |
| RAW file editing | No — JPG, PNG, WebP only | Yes |
| Photo library management | No | Yes |
| Preset count | 37 built-in presets, 12 groups | Unlimited — create, buy, or download |
| Batch editing | Up to 10 photos; per-photo unlock | Sync settings across your library |
| Export resolution | Full original resolution | Full original resolution |
| Photos leave your device | No — runs entirely in the browser | Local app; optional cloud sync |
Frequently asked questions
Can I get Lightroom-style results without buying a subscription?
Yes. The tool applies the same color grading concepts professionals use in applications like Adobe Lightroom — tone curves, white balance shifts, split toning, saturation and vibrance, vignette, film grain — directly in your browser. No subscription, no account required. Adobe Lightroom is a full professional application with library management, RAW editing, and much more; this tool focuses specifically on applying preset color grades to JPEG, PNG, and WebP photos, free.
What preset styles are available?
There are 37 presets across 12 groups: Cinematic (Teal & Orange, Blockbuster, Noir, Hollywood), Dramatic (Punch, Clarity, Storm), Mood (Soft Glow, Pastel), Dreamy (Lavender, Rose, Blush, Cotton, Petal), Vintage (Faded, Kodak 70s, Polaroid), Film (Portra 400, Fuji Velvia, Kodak Ektar, CineStill 800T), B&W (Classic, Red Filter, Yellow Filter, Green Filter, High Key, Deep Noir, Platinum), Warm, Cool, Vibrant, and Matte.
Can I apply different filters to different photos in one batch?
Yes. Upload up to 10 photos at once. By default all photos follow the global preset and intensity. Click the lock icon on any thumbnail to unlock that photo — it then keeps its own preset and intensity independently of the rest of the batch. This is useful when one photo in a series was shot under different lighting and needs a different treatment while the others stay consistent.
Does the intensity slider affect the export quality?
No. The intensity slider controls how much of the color grade is blended over the original image — from 0% (unchanged) to 100% (full effect). The export always renders at the full original resolution. JPEG sources are saved at 0.95 quality; PNG sources are saved as PNG to preserve any transparency.
What input and output formats are supported?
Input: JPG, PNG, and WebP. Output: JPG at 0.95 quality for JPEG and WebP sources; PNG for PNG sources so transparency is preserved. Each photo is exported as a separate file — no ZIP archive, no watermark.
Free, no account, nothing uploaded. Thirty-seven Lightroom-style color grades, batch support for up to ten photos with per-photo independence, and an intensity slider to dial in exactly how strong the effect looks — all running in your browser.
Open the editor